
As cloud environments become more complex, managing infrastructure as code (IaC) efficiently is crucial. Traditionally, ARM templates have been the go-to solution for defining and deploying Azure resources. However, they can be verbose and challenging to maintain. Azure Bicep, a domain-specific language (DSL) for Azure resource management, offers a simpler, more readable, and modular approach.
This blog explores both methods and provides a detailed, step-by-step guide for generating Bicep templates using an Azure Resource ID. Whether new to Bicep or looking for a seamless migration strategy, this guide will help you streamline your Azure deployments and enhance maintainability.
What are ARM templates and Azure Bicep?
Azure Resource Manager (ARM) Templates are JSON-based files that define and deploy Azure infrastructure as code (IaC). They provide a declarative way to specify resources, configurations, and dependencies in Azure, allowing for repeatable and automated deployments. ARM templates support parameters, variables, and functions to enable flexibility and reusability, but due to their JSON syntax, they can be complex and verbose.
Azure Bicep is a domain-specific language (DSL) designed to simplify defining and deploying Azure infrastructure. It is an abstraction over ARM templates, offering a more readable and modular syntax while compiling down to standard ARM JSON templates. Bicep improves maintainability, reduces complexity, and enhances code reusability, making it a preferred choice for managing Azure resources efficiently.
2 Methods to migrate
Migrating ARM templates to Azure Bicep can be achieved through two efficient methods, mainly when dealing with existing resources in the Azure portal and transitioning your deployment templates to Azure Bicep templates:
- Method 1: Using the ‘Decompile’ Command – A traditional approach for converting existing ARM templates.
- Method 2: Using an Azure Resource ID – The quickest method for creating Bicep templates directly from existing Azure resources.
Templates provide a way to declaratively describe the infrastructure and configuration of resources within an Azure environment. By using Azure automation templates, you can specify the resources, dependencies, and configurations required to deploy and manage Azure services consistently and automate workloads using arm templates / Bicep templates. This allows for automated, repeatable, and version-controlled deployments across Azure environments.
In this blog, I provide an overview of Method 1 with high-level details. Method 2, on the other hand, is presented with a detailed tutorial with step-by-step instructions for implementation.
Prerequisites
To get started with preparing Bicep, you will need the following tooling:
Method 1: Generating Template – Systematic Approach of 5-Phase Workflow with Decompile Command

Microsoft suggests a migration in 5 phases for the Azure bicep template to convert the ARM Template {.json file} into Bicep Template {.Bicep file}.
Convert –> Migrate –> Refactor –>Test –> Deploy
For the traditional approach of migrating ARM templates to Bicep, each phase is mentioned below:
- Review Existing ARM Templates: Examine your existing ARM templates to understand their structure, dependencies, and configurations.
- Use the ‘Decompile’ Command: Convert the ARM template to Bicep by running the az bicep decompile command. This command translates your ARM template into a corresponding Bicep file.
To Generate the Bicep File From ARM Template:
az bicep decompile –file {json_ARMtemplate_file_Path}
To Generate the parameter File: (Refer to the converted BICEP file here.)
az bicep format –file {Generated_bicep_file_path}
or
az bicep generate-params –file {Generated_bicep_file_path}
3) Refactor the Bicep Template: Once you have the Bicep file, review and modify it to optimize for readability and functionality. Adjust any hard-coded endpoint values into parameters & identify any redundant definitions, and redefine.
Redefine the Bicep code, as the generated Bicep template may not be perfect for deployment in production. This phase involves reviewing and modifying every line carefully, ensuring that connections and definitions adhere to Microsoft’s expected syntax to minimize deployment errors.
4) Test in a Staging Environment: Validate your template structure with the command below, and deploy the Bicep template in a staging environment to validate that everything works as expected. This helps catch any discrepancies between the original ARM template and the new Bicep configuration
az deployment group what-if –resource-group <resourcegroupname> –template-file <TemplateFilePath>
<resourcegroupname> — Your resource group name
<TemplateFilePath> — Your local file path where the bicep template saved{example: d:\main.Bicep}
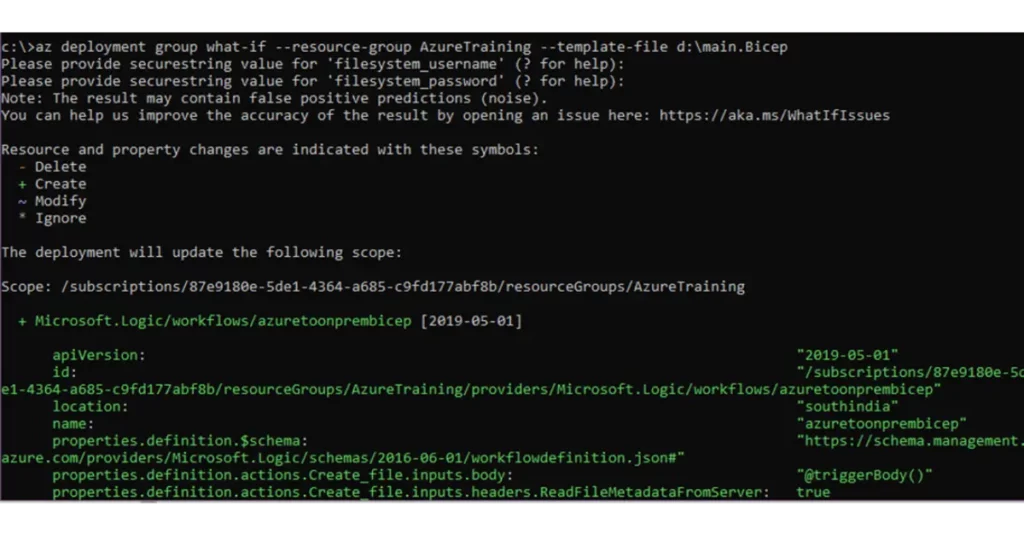
- After the validation is successful, deploy the bicep template using the below command:
az deployment group create –resource-group < resourcegroupname >–template-file <TemplateFilePath> - If your template includes parameters, you can deploy them by specifying values: Option 1: Using a Parameter File (Recommended Approach)
- To deploy with a parameter file, use the following command:az deployment group create –resource-group <resource-group-name> –template-file <TemplateFilePath> –parameters @<parameters-file.json>
The @ symbol indicates that the file should be used as an input for the parameters defined in the template. Option 2: Defining Values Directly in the Deployment Command - Alternatively, you can define parameter values directly in the command:
az deployment group create –resource-group <resource-group-name> –template-file <TemplateFilePath> –parameters parameterName1=value1 parameterName2=value2This method allows you to specify parameter values inline without using a separate parameters file5) Deploy to Production: If the testing phase is successful, you can deploy the Bicep template to your production environment using the same Azure CLI commands, ensuring a smooth transition from ARM to Bicep.This method is detailed in the Microsoft Learn page: https://learn.microsoft.com/en-us/azure/azure-resource-manager/bicep/migrate
Method 2: Generating Template Using an Azure Resource ID
This Azure Bicep quickstart template method uses Visual Studio Code (VS Code) to generate a Bicep template directly from an existing Azure resource. The “Resource ID” is the reference for the resource to ensure accurate Bicep conversion. Follow these steps:
Step 1: Open Visual Studio Code & Create A Bicep File
- Launch Visual Studio Code on your system.
- Make sure the Bicep extension is installed in VS Code. If not:
1. Go to the Extensions tab.
2. Search for “Bicep” and install the official extension. - Create a new empty file with the extension of “. Bicep”

Step 2: Open the Command Palette
- In Visual Studio Code, press the shortcut key:
Ctrl + Shift + P (Windows) - This opens the Command Palette, a search box for executing commands.
Step 3: Insert Resource
- In the Command Palette, type: Insert Resource
- Select the “Insert Resource” option from the list.
- You will be prompted to enter a Resource ID.

Step 4: Get The Azure Resource ID
To retrieve the Resource ID of an existing Azure resource:
Option 1: Azure Portal
- Go to the Azure Portal.
- Navigate to the desired resource.
- Under the “Properties” section, find and copy the Resource ID.
Example Resource ID: /subscriptions/12345678-1234-1234-1234-123456789012/resourceGroups/MyResourceGroup/providers/Microsoft.Logic/workflows/MyLogicApp
Option 2: Azure CLI
Run the following command to fetch the Resource ID. Here I’ve given for Logicapp resource (it varies depending on the resource type):
az resource show –resource-group <RESOURCE_GROUP> –name <LOGIC_APP_NAME> –resource-type Microsoft.Logic/workflows –query id –output tsv
Replace:
- <RESOURCE_GROUP>: Name of the resource group where the Logic App exists.
- <LOGIC_APP_NAME>: Name of the Logic App.
- Microsoft.Logic/workflows: The resource type for Logic Apps in Azure.
Example: az resource show –resource-group HandsOnRG –name myStorageAccount –resource-type Microsoft.Storage/storageAccounts –query id –output tsv

Step 5: Generate Bicep Template
- Paste the retrieved Resource ID into the Command Palette prompt.
- VS Code will generate the corresponding Bicep code for the resource.
- The generated Bicep file will include all the properties and configurations of the resource that will be written into .Bicep file created in ‘Step1’

Step 6: Review & Refactor
The generated Bicep template may include unnecessary or hardcoded values. Refactor it as needed:
- Replace hardcoded values with parameters or variables for flexibility.
- Test the template to ensure it meets your deployment requirements.
The template generated would be like this:

The refactoring I’ve done for this scenario requires defining the resource group location as a parameter. If the solution needs to be deployed across different environments, a parameter file can specify values that may vary across environments, such as endpoint values. Alternatively, parameter values can also be provided directly during deployment using CLI command also.
Replaced: location: ‘southindia’ TO location: paramloc (southindia is what it says in my location)
And defined the location in parameter: param paramloc string = resourceGroup().location

Step 7: Deployment via Azure CLI
- Validate before deployment using the below command:az deployment group what-if –resource-group <resourcegroupname> –template-file <TemplateFilePath>
<resourcegroupname> — Your resource group name<TemplateFilePath> — Your local file path where the bicep template saved{example: d:\main.Bicep} - Deploy the bicep template using the below command:az deployment group create –resource-group < resourcegroupname >–template-file <TemplateFilePath>
• Once deployed, verify the corresponding resource in the Azure portal.
• As a best practice for deploying bicep templates – Always validate your Bicep templates using the what-if command before deploying.
• Here, I used the CLI deployment method. If you opt to deploy bicep in Azure DevOps, the same scripts in the pipeline can be used with the “Deploy Using Azure CLI” task.
Summary – Migrating to Azure Bicep
We have described two powerful methods for migrating from ARM templates to Azure Bicep. Both will work, but opting for Method 1 can be tedious. The second method lets you quickly generate Bicep templates for existing Azure resources using their Resource IDs. This approach simplifies the template creation process and accurately represents resource configurations. Once the template is generated, validate it and then deploy it to Azure for a smoother migration compared to Method 1, as refactoring is minimal.
Azure Bicep is considered an emerging technology in the Azure world. It represents a shift towards more streamlined and readable infrastructure as code (IaC) practices, offering a simpler alternative to traditional ARM templates. Azure Bicep is gaining traction as organisations seek easier ways to define and manage their Azure resources, automate deployments, and improve overall deployment efficiency. As Azure continues to evolve, Bicep is expected to become even more prominent in managing and deploying Azure resources. While ARM templates will still be used for specific scenarios, Azure Bicep’s growing popularity indicates that it will become the preferred method for many in the Azure Cloud.
Migrating from ARM templates to Azure Bicep is often part of a broader application or cloud modernisation initiative. If you’re planning a larger transformation, explore our software migration services to see how we help organisations modernise legacy applications, migrate to the cloud, and upgrade critical systems.
Contact us to discuss your Azure migration or system integration requirements.
Frequently Asked Questions
What is the main difference between ARM templates and Azure Bicep?
ARM templates are JSON-based files used to define and deploy Azure infrastructure. They are declarative and support parameters, variables, and functions, but their JSON syntax can become verbose and difficult to maintain at scale. Azure Bicep is a domain-specific language that sits on top of ARM, offering a cleaner and more readable syntax. It compiles down to standard ARM JSON, so the underlying deployment mechanism is the same, but the authoring experience is significantly simpler.
Do I need to learn a completely new tool to use Azure Bicep?
Not entirely. If you are already familiar with ARM templates and Azure deployments, Bicep builds on that foundation. You will need Visual Studio Code with the Bicep extension and Azure PowerShell or Azure CLI. The concepts of parameters, variables, and resource definitions carry over, but the syntax is more concise and easier to read. Microsoft also provides migration tooling to help convert existing templates.
What are the two methods for migrating from ARM templates to Bicep?
The first method uses the decompile command, which converts an existing ARM JSON template into a Bicep file through a structured five-phase workflow: convert, migrate, refactor, test, and deploy. The second method generates a Bicep template directly from an existing Azure resource using its Resource ID inside Visual Studio Code. The second method is generally faster and requires less refactoring, making it the recommended approach for most scenarios.
When should I use the decompile method versus the Resource ID method?
The decompile method is suited to situations where you already have ARM template files and want a systematic, phase-by-phase migration process. It gives you full control but requires careful review of the output. The Resource ID method is quicker and works directly from live Azure resources, generating an accurate Bicep representation with minimal manual work. For most practical migrations, the Resource ID method is the faster and cleaner path.
How do I find the Resource ID of an Azure resource?
There are two ways. Through the Azure Portal, navigate to the resource, go to the Properties section, and copy the Resource ID directly. Through the Azure CLI, run the az resource show command with the resource group name, resource name, and resource type, adding the query id and output tsv flags to return just the ID. Both approaches give you the same value, which you then paste into the VS Code Command Palette to generate the Bicep template.
What does the generated Bicep template include?
The generated file includes all the properties and configurations of the resource as they exist in Azure at the time of generation. It reflects the current state of the resource accurately. However, the output may include hardcoded values such as specific locations or endpoint strings that should be replaced with parameters or variables before the template is used for repeatable deployments across environments.
Why is refactoring the generated template important?
Because generated templates often contain hardcoded values that are environment-specific. For example, a location set to a specific Azure region should be replaced with a parameter so the same template can be deployed to different environments without modification. Refactoring also improves readability and ensures the template meets your organisation’s deployment standards before it reaches production.
How do I validate a Bicep template before deploying it?
Use the az deployment group what-if command, providing your resource group name and the local file path of the Bicep template. This command performs a dry run and shows what changes would be made without actually deploying anything. It is a best practice to always run this validation step before any deployment, whether to a staging or production environment.
Can I pass parameter values during deployment without a separate file?
Yes. There are two options. You can use a parameter file, which is the recommended approach for managing environment-specific values in a structured and version-controlled way. Alternatively, you can pass parameter values directly in the deployment command by specifying each parameter name and value inline. Both approaches work with the az deployment group create command and can also be used in Azure DevOps pipelines with the Deploy Using Azure CLI task.
Is Azure Bicep replacing ARM templates entirely?
Not immediately, and ARM templates will continue to be supported for specific scenarios. However, Bicep is gaining significant traction as organisations look for more readable and maintainable ways to manage Azure infrastructure as code. As Azure continues to evolve, Bicep is expected to become the preferred authoring method for most teams, with ARM JSON remaining in use primarily for legacy or tooling-specific situations.